

A memorable influencer kit depends on more than what goes inside the box. Successful influencer kit manufacturing coordinates merchandise, packaging, decoration, assembly and delivery around the campaign’s audience, product category and deadline. When these decisions are planned together, teams can manage presentation and production as one coordinated brief.
You may already have a clear campaign concept, but turning it into a consistent kit that arrives ready to use takes careful coordination. Materials, print and finishing choices affect how the package looks, feels and protects its contents. Late changes can also put the production schedule under pressure.
This article explains how to plan kits for different industries, choose packaging materials and finishes, and assess rush production without overlooking quality or logistics. You’ll also learn how prototypes, artwork approvals, component checks and delivery coordination fit into the process, turning a creative concept into a workable manufacturing plan.
• Match kit contents and presentation to the audience, product category and campaign objective before production begins.
• Choose packaging materials and finishes by balancing visual impact, protection, assembly needs and shipping constraints.
• For a compressed schedule, lock specifications and approvals early so production decisions don’t create avoidable delays.
• Define every item, component, decoration and packing step in the product brief to reduce ambiguity during sampling and manufacturing.
• Coordinate sourcing, production oversight and delivery planning as connected parts of the project to keep decisions visible from concept through dispatch.
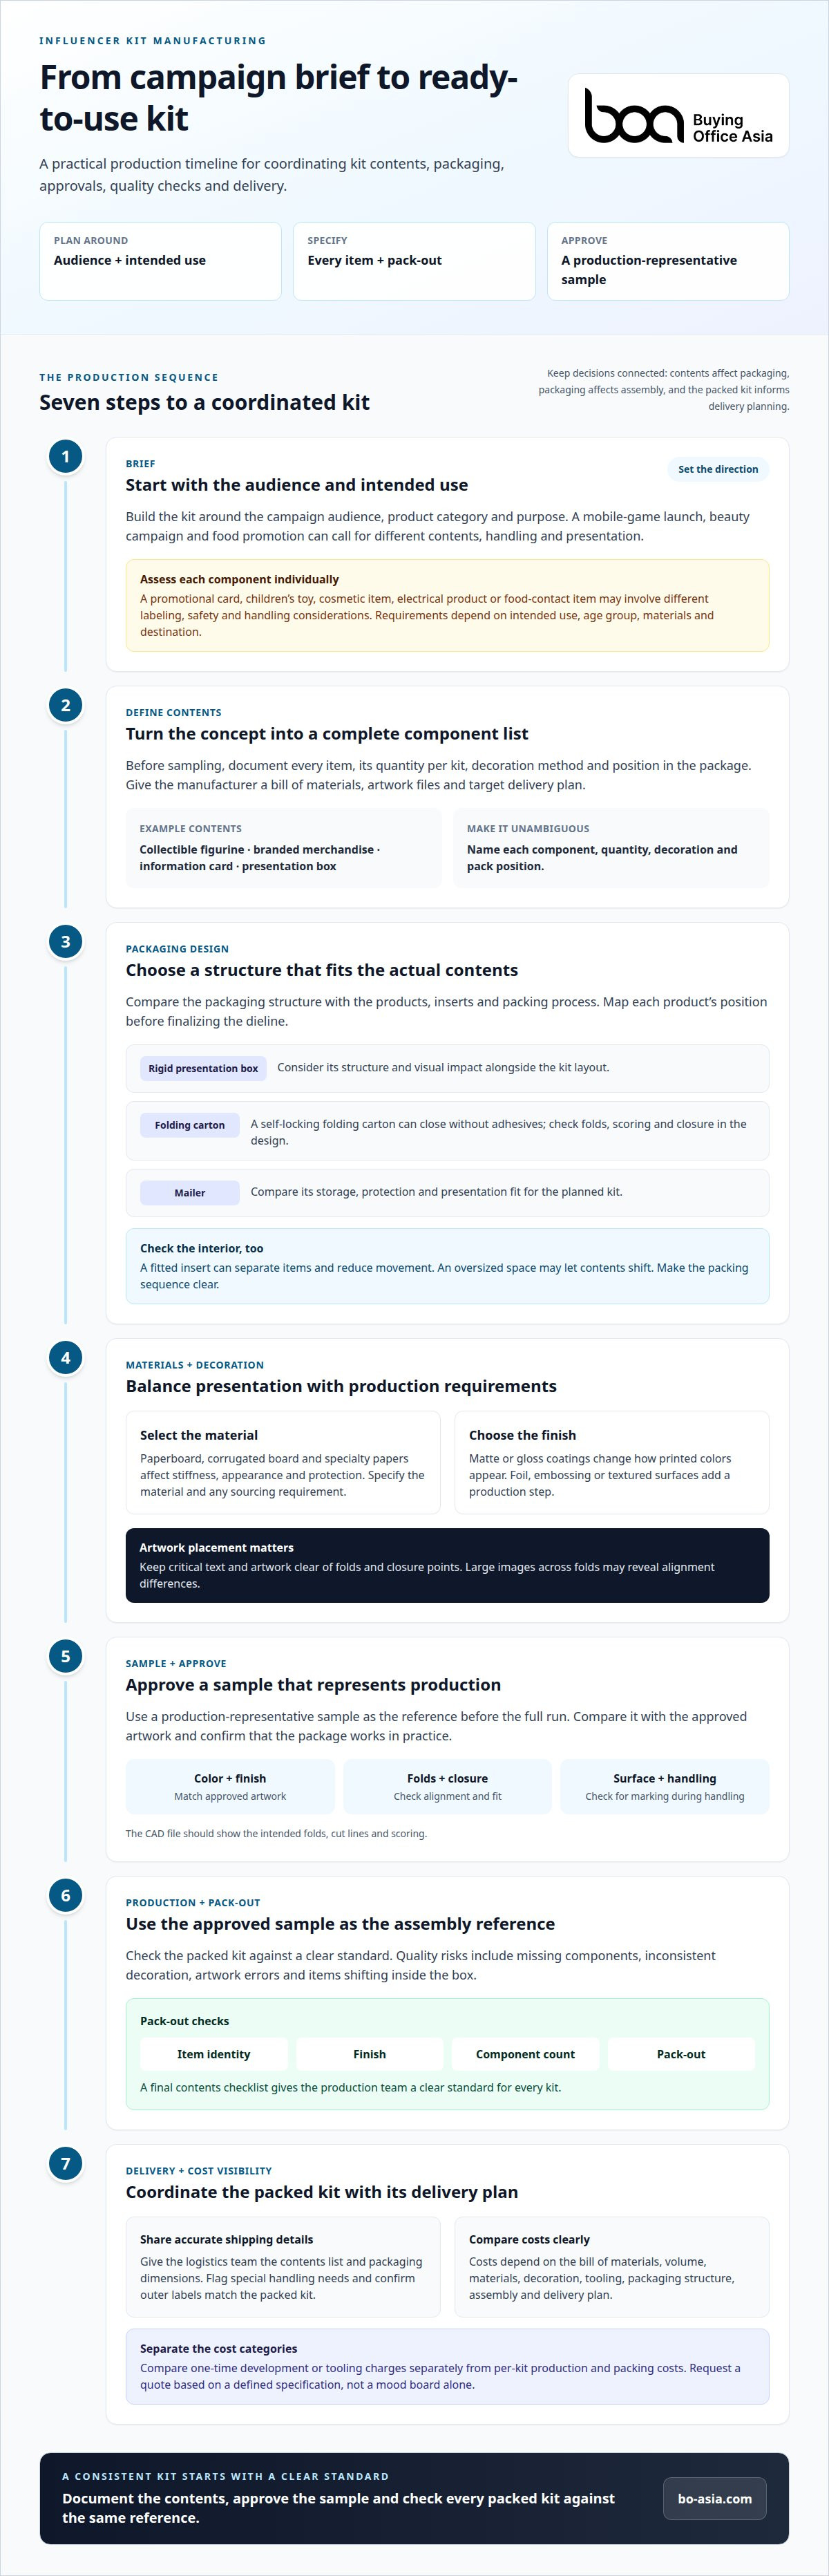
Build the kit around the campaign’s audience, product category and intended use. A mobile-game launch, beauty campaign and food promotion each call for different contents, handling and presentation.
An influencer kit manufacturer coordinates custom items, packaging and assembly; a fulfillment agency generally focuses on storing and dispatching goods you supply. Print-on-demand suits customizable printed items made as orders arrive, while a coordinated production run works better for kits with several custom components. Compare who manages artwork, samples, component sourcing, assembly checks and dispatch details. A figurine, printed insert and fitted box, for example, require more coordination than printing alone.
To vet a manufacturer, share a bill of materials, artwork files and target delivery plan. Review relevant samples and ask how changes, inspection findings and corrective actions are documented. For custom merchandise and packaging, OEM and ODM contract manufacturing can support product development and production coordination.
US requirements depend on each item’s intended use, age group, materials and destination, so assess kit components individually. A promotional card, children’s toy, cosmetic item, electrical product or food-contact item may involve different labeling, safety and handling considerations. Don’t treat a campaign kit as one undifferentiated product: document each component, who will use it and how it will be distributed.
For shipping, give the logistics team an accurate contents list and packaging dimensions. Flag items that need special handling and confirm that the outer labels match the packed kit. Applicable requirements depend on the products and distribution context.
There’s no single manufacturing cost for every kit. The total depends on the bill of materials, order volume, material selection, decoration, tooling, packaging structure, assembly and delivery plan. A custom-moulded item, for example, involves different development and production decisions than a printed insert. Request a quote based on a defined specification, not a mood board alone.
Compare options by separating one-time development or tooling charges from per-kit production and packing costs. Then consider whether a simpler component or finish can preserve the campaign’s purpose while reducing complexity.
A game-studio kit might combine a collectible figurine, branded merchandise, an information card and a presentation box. A beauty campaign might pair product samples with usage information and protective inserts. The contents should follow the campaign brief, not a standard template. Before sampling, list every item, its quantity per kit, decoration method and position in the package.
Common quality risks include missing components, inconsistent decoration, artwork errors and items shifting inside the box. Use an approved sample as the assembly reference, then check item identity, finish, count and pack-out. A final contents checklist gives the production team a clear standard for every kit.
Packaging creates the first physical impression and protects each item in transit. Choose the structure, material and finish together, using the actual kit contents as your design reference.
Start with the box’s purpose: hold the products securely, present them clearly and support the planned packing process. A rigid presentation box, folding carton and mailer each offer a different balance of structure, storage and visual impact.
A self-locking folding carton can simplify assembly because it closes without adhesives. Confirm the chosen box style and closure construction with the packaging supplier. Compare the interior layout with the exact contents, including inserts, cards and fragile components. A fitted insert can separate items and reduce movement, while an oversized space may let them shift.
For a multi-item kit, map each product’s position before finalizing the dieline. Check how the lid opens, what the recipient sees first and whether the packing sequence is clear. The CAD file should show the intended folds, cut lines and scoring. Scoring lets paper fold along selected lines without cutting through them.
Choose finishes based on the brand effect and production requirements. Matte or gloss coatings change how printed colors appear; foil, embossing or a textured surface adds another production step. A dark, foil-stamped lid can create contrast, while a large image across folds may reveal alignment differences. Keep critical text and artwork clear of folds and closure points.
Approve a production-representative sample before the full run. Compare its color, finish, fold alignment and closure with the approved artwork. Check that the surface withstands packing and handling. A finish that marks easily can undermine an otherwise polished presentation.
Paperboard, corrugated board and specialty papers each affect stiffness, appearance and protection. FSC®-certified packaging fiber can come from responsibly managed forests, recycled materials or other controlled sources. Specify the material and any sourcing requirement, then review the supplier’s documentation for the selected packaging.
Before production, record the box dimensions, board type, print references, finish, insert layout and closure method. During inspection, compare a packed sample with the approved version. Check that the box closes securely, panels remain aligned and contents sit in their intended positions. A clear specification makes packaging decisions measurable rather than subjective.
An accelerated campaign schedule needs a fixed delivery date and a production plan built backward from it. Set visible milestones for artwork approval, sampling, production, inspection, packing and transport. This brings schedule conflicts to light early, before a late design change affects every component.
List each item, its supplier, required artwork and dependencies. A custom-moulded collectible may need development before production, while a printed card can proceed once its files are approved. Mark decisions that block other work, then assign an owner and response date for each approval.
Build the plan around the slowest or least flexible component. Confirm when production can start, what inputs the factory needs and when finished goods must be ready for inspection. Keep artwork, packaging specifications and quantities in one controlled document. Version labels help prevent outdated files from reaching production.
If the schedule is compressed, simplify the parts that create the most dependencies. A campaign might replace a newly tooled accessory with an existing product, reduce decoration layers or use a standard insert instead of a custom-fitted one. Assess each change against brand impact, protection and assembly requirements.
Don’t cut review steps blindly. Rushed approval of color, dimensions or component fit can cause rework that takes even longer. Product development and sampling support can help teams assess a simplified design before committing it to mass production. Keep the approved sample or reference specification accessible to production staff.
Set decision gates for artwork, sample approval, first production output, finished-goods inspection and final packing. At each gate, name the reviewer and define the acceptance criteria. A kit containing a printed insert and a figurine, for example, needs checks for correct artwork, item identity, consistent decoration and complete assembly.
Document defects with clear photographs, quantities affected and required corrective action. Production oversight helps track those actions while goods are still being made, instead of relying on a final inspection to uncover a recurring issue. Keep approved files and change records together so the factory can distinguish current instructions from superseded versions.
Work backward from the date kits must be in hand, not just the factory completion date. Allow time for inspection, export packing, transport, customs processing and delivery to the campaign destination. Transit choices depend on shipment size, route, urgency and handling needs, so compare the complete delivery plan, not production speed alone.
Before dispatch, reconcile packed quantities with the order and destination list. If one component threatens the schedule, consider whether a staged release would keep the campaign on track. Record which kits ship first, what remains outstanding and how the receiving team will identify each carton.
Choose contents according to each item’s role in the campaign, then plan for how variations affect purchasing and assembly. A kit might include a campaign anchor, supporting resources, creator tools and a reusable keepsake. This framework helps teams separate essential components from extras that add complexity without a clear purpose.
Consider these content roles when building the assortment:
Select the main item recipients should associate with the launch, such as a branded accessory or limited-run merchandise piece.
Add practical information that supports content creation, such as approved product details, campaign messaging or a guide to available features.
Include a recipient-specific note or variable card when personalization is part of the campaign experience.
Choose something recipients can keep or use after the campaign, provided it fits the brand and audience.
Personalized kits need an information plan as well as a product plan. Decide which details vary by recipient, who supplies the final data and how each version will be matched to its destination. A creator-specific card, for example, may need separate artwork files or variable print data. Keep that information controlled and separate from the general production specification.
Some campaigns need more than one kit configuration. A press preview, creator outreach package and event handout may share a core concept but need different contents. Define each version as its own approved configuration, including permitted substitutions. This helps procurement distinguish planned variations from unintended component changes.
Packaging can also serve different operational purposes. A presentation package creates a branded reveal, while an outer transit carton protects goods as they move through the delivery network. The two can be combined or kept separate, depending on the campaign’s presentation and distribution plan. Specify which packaging is for the recipient and which protects the shipment in transit.
Finally, plan for replenishment and leftover components. Decide whether unused items can support a later campaign, whether printed content may become outdated and how replacement pieces will be identified. A campaign card tied to a launch date, for instance, may need updating for a later release even if the accompanying merchandise remains usable. This distinction helps teams manage inventory and avoid assembling kits with mismatched campaign materials.
Packaging specifications should connect the visual concept to the practical requirements of packing, handling and delivery. Keep the approved design, material choices, print files and assembly instructions aligned so suppliers are working from the same version. Review how the contents fit together, where protective materials are needed and whether the recipient-facing presentation can remain intact during transit.
Before approving a configuration, check a physical sample with the intended contents in place. Confirm that the package opens as intended, components stay secure and personalized inserts match the right kit. Document approved changes and substitutions alongside the configuration instead of relying on informal instructions. These checks help keep packaging consistent across assembly runs while allowing each version to serve its purpose. They also make it easier to identify which components can be retained when a campaign changes.
Start by turning the campaign concept into a product architecture: identify what must be custom, what can use an existing form and how each item will be made. This keeps design effort focused on details that affect the recipient’s experience. A custom centerpiece can carry the campaign identity while standard components support it, provided their dimensions and interfaces work together.
Break each custom item into functional parts before choosing a production method. A desk accessory, for example, might have a base, a movable element and a decorative feature. Decide which parts need separate manufacture and which can be integrated. Fewer joins can simplify assembly, while separate parts can allow more color or material choices. Make these trade-offs during concept development, before they determine tooling.
Review the geometry with the intended production process in mind. Thin walls, deep recesses, sharp transitions or complex undercuts can make a part harder to produce consistently. A designer and manufacturing team can adjust these features while preserving the visual intent. Consider how components locate and connect, too: locating features can guide assembly, while poorly aligned interfaces can lead to rework.
Compare processes based on shape, material, surface detail and expected production scale. A process suited to a simple flat item may not work for a three-dimensional object with fine features. Custom tooling may enable a distinctive form, while adapting an existing design can reduce development complexity. Assess tooling investment alongside expected production volume, future reuse and the cost of later design changes.
Decide early whether recipients will receive one standard configuration or several tailored versions. Shared components across versions can simplify purchasing, but each variation adds identification and assembly decisions. A campaign with region-specific inserts, for example, can keep the same merchandise while changing only the language component. Plan the assembly sequence so each version is easy to distinguish and build.
Give production teams a coordinated technical package: dimensioned drawings, material requirements, process assumptions and component interfaces. Identify critical dimensions that affect fit or function, and distinguish them from cosmetic preferences. For custom tooling, document the design basis and intended use so future production decisions remain tied to the original requirements. This makes supplier quotations easier to compare on an equivalent scope.
For support turning a custom product concept into a manufacturing plan, discuss your project with Buying Office Asia.
Buying Office Asia can coordinate sourcing and procurement for influencer kits with multiple products, packaging components or production partners. Its end-to-end approach aligns supplier decisions, specifications and purchasing, while factory-direct price negotiations support transparent procurement discussions.
For larger campaigns, high-volume sourcing and procurement can support consolidated purchasing. A dedicated Asia procurement team coordinates with suppliers on the ground, helping your business maintain visibility as approved kit components move toward production. This support is useful when your internal team needs a partner to coordinate a complex or high-volume project.
Share your kit brief, component list and production goals with Buying Office Asia to discuss your project.
Use your next planning meeting to align campaign, procurement, brand and operations teams around one launch objective. Agree on who owns final decisions, which trade-offs are acceptable and how changes will be escalated. This shared approach keeps creative intent connected to commercial priorities and delivery planning.
In influencer kit manufacturing, work continues after the creative brief is approved. Keep decisions tied to the intended recipient experience so teams can address new questions without losing sight of the campaign. After launch, gather feedback from creators and internal teams. Their observations can inform future kit concepts and help clarify which details matter most to your audience.
Buying Office Asia can support your next project with sourcing and procurement coordination for production in Asia. If you’re ready to discuss your requirements, contact Buying Office Asia. A clear starting brief helps turn your campaign idea into a practical next step.
It means specifying and producing a campaign kit as a finished deliverable rather than treating each item as an unrelated purchase. The key distinction is whether the order covers loose components or assembled, recipient-ready kits. That scope affects quotations, quantity reconciliation and handoff responsibilities. Define the deliverable clearly in purchasing documents so suppliers price and report against the same unit.
Timing depends partly on what “complete” means in your schedule. Factory completion, packed-goods readiness, dispatch and delivery to creators are distinct milestones. Set the required in-hand date first, then define whether fulfillment includes address validation, recipient sorting, individual dispatch and delivery confirmation. A project with separate destinations needs those handling steps included in its plan, not treated as factory production time.
Packaging can reduce material use through right-sized structures, fewer separate layers and less empty space. You could also consider reusable packaging or designs that separate easily into material types after use. Evaluate these choices against product protection and the waste-handling options available to recipients. A compact design that still protects its contents may avoid unnecessary packaging, while mixed-material constructions can make separation harder.

A shipment can pass an AQL check even when the sample contains defects. In the normal single-sampling worked example, code letter L at AQL 2.5 calls for a 200-unit sample. The example's sampling table calls for inspecting 200 units: the lot passes if 10 or fewer units fail and is rejected if 11 or m...
Custom card game manufacturing connects artwork, printing, finishing, cutting, collation and packing. The order and equipment vary by supplier and product. Confirm the proposed process flow before approving production, including where texture, coating and corner finishing occur and how the complete...

A collector’s edition succeeds when its packaging supports the product experience and the practical demands of production. Collector’s edition box manufacturing brings design, materials, components, and assembly planning together in one coordinated brief. The aim is a presentation that feels conside...